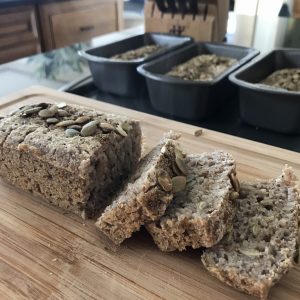
I’ve been searching for a bread that I could make that is gluten, dairy, and egg free to satisfy as many of my alternative eaters as possible, while being full of nutrients, delicious, and hearty to eat.
But most of all, I wanted it to be bread-y.
You know, like bread is supposed to be. I wanted to toast it, slice it, spread stuff on it, and generally, enjoy it like bread.
So many “healthy” or gluten-free breads fall short in some (or all) of those departments.
But not this Buckwheat Bread!
Despite its name, buckwheat is not actually related to wheat at all, which makes it a wonderful alternative for those with allergies or intolerances.
Buckwheat groats are the fruit seed of the buckwheat plant, and much like oats (they’re in the same family), it’s a nutrient dense plant that boasts manganese, copper, magnesium, fiber, protein, and makes a wonderful bread base.
If you’ve read my blog about overnight oatmeal and preparing grains properly, you know I’m a fan of fermented foods and fermenting grains for better digestion and nutrient absorption.
I was truly awed the first time I made this recipe, inspired by the amazing folks at Breadtopia. The credit for this recipe goes to them, and I hope you’ll enjoy my rendition of it!
*update 10/29/17: some of you noticed some variations in your experience during the fermenting process, which prompted me to do some further experimentation and research. THANK YOU for your comments and questions!
Because we cannot always control the freshness or treatment of the groats we buy prior to their arrival to our home, they may arrive in various states (this is true of many foods – we’re just not as aware as we don’t cook from scratch always). To combat some of the unknowns and also to create the best experience, I have added some additional optional steps around rinsing the groats more during the fermentation process. I have made over 20 batches of this bread to date and only once had a slightly ripe smell – which I attributed to lack of freshness of the groats, but of course that’s an unknown. Please let me know how the rinsing goes and how your bread turns out! xoxo
Phase One:
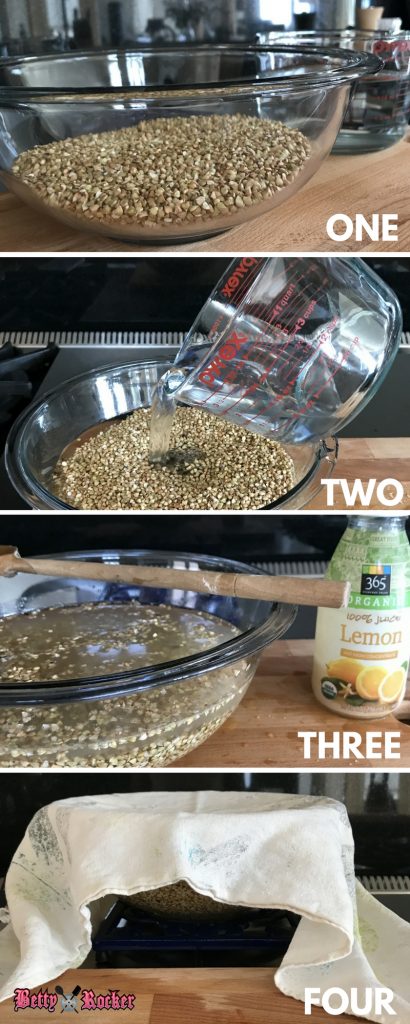
- Measure 2 1/2 cups organic buckwheat groats into a bowl.
- Add 3 cups water.
- Add 3 T (tablespoons) lemon juice and stir together.
- Cover and set on your stovetop for 6-8 hours (sometimes I just leave it overnight).
- Optional – drain your groats and add fresh water 1-2 times during the soaking process.
Let me make healthy eating easy for you! Take my Eating Type Quiz!
Phase 2:
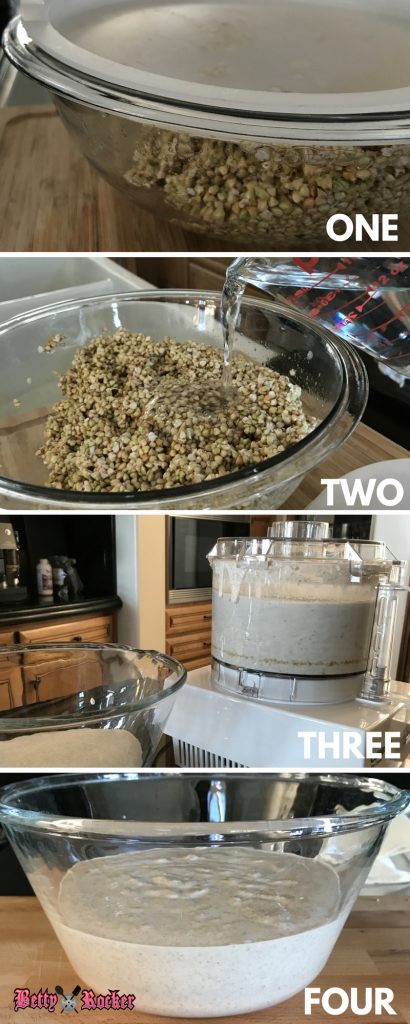
- Drain the water from the groats. I use a rubber lid on my bowl to strain out the excess liquid. Rinse your groats 1-2 times in fresh water and re-drain thoroughly.
- Add 1 1/3 cups fresh water to the groats once drained their final time, and gently stir to combine.
- Place half the mixture in your food processor and blend until smooth. Transfer the batter to a new bowl and repeat with the remaining mixture. Transfer the remainder to the bowl so all the batter is in the bowl. If you try to add all the groats and water to the food processor at once, it will spill over and make a mess. You’ll end up with about 5 cups of batter total.
- Cover mixture and set aside in a warm place (I usually place it on top of my stove, but temperature should be between 67-70 F) for 24 hours. It will ferment more quickly at warmer temperatures, or in the oven with the light on. It’s not going to rise a ton, but it will go from about 5 to 6.5 cups. Don’t mix or stir the batter during the rising process, as it will deflate.
Phase 3:
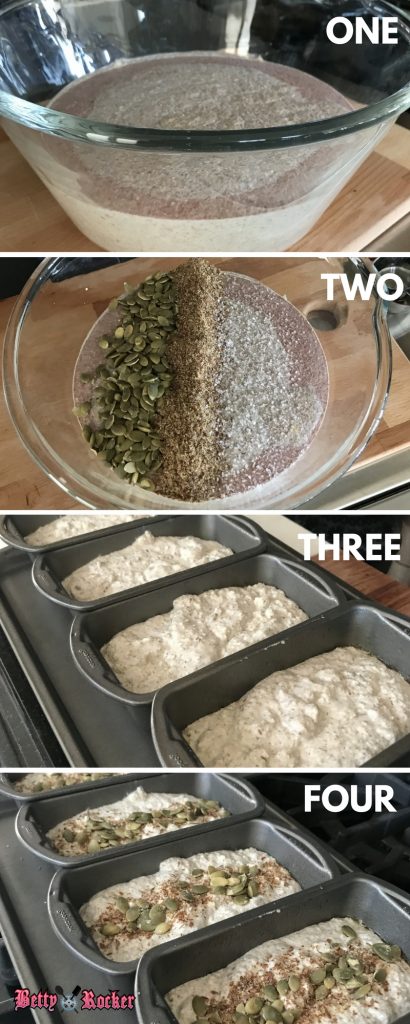
- Uncover batter. You can see from the darker colored outer ring that the batter has expanded during fermentation. Yours may not change color at all, and that’s ok! I live in a very humid climate at sea level, and food behaves differently in different places.
- Add 1/3 cup pumpkin seeds, 3 T flax seed, and 1 tsp sea salt and gently fold into your batter. Don’t over-mix.
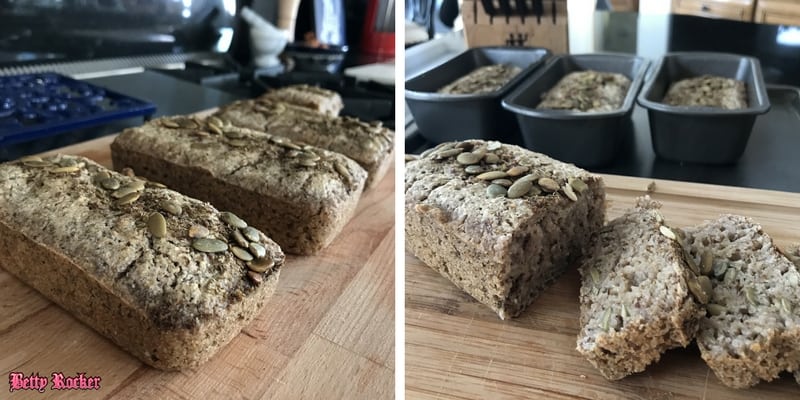
- Transfer batter evenly to loaf pans. You can use one large loaf pan (for a denser, large loaf), or 4 mini loaf pans (pictured, and recommended – I just like how it comes out better).
You can line your loaf pan with parchment paper, or use a little olive oil to coat the pan. Garnish with a sprinkle of pumpkin seeds, flax seeds, and sea salt. - Cover and let the batter rise for another 30-60 minutes.
Phase 4:
- Preheat to 350 F. Optionally, you can let your bread sit in the oven during preheating, which can give it additional time to “rise” – just start your timer once it reaches the right temperature.
- Bake for 1 hour 20 minutes for large loaf, 1 hour 10 minutes for small loaves (approximately – ovens and baking pan material varies). Test with a toothpick inserted and visually see the bread pulling away and turning golden brown against the side edges. The first time I made this, I pulled it out of the pan and sliced into it to see if it was actually done. It needed more time. This helps in getting to know the recipe and your oven and how it all works together. There isn’t going to be an “exact” time that works universally so check it when you start to smell it, then test it.
- Remove from pan and cool for 15-20 minutes before slicing (if you can wait that long).
Nutrition Facts
TIPS:
- The bread keeps really well for 7-8 days refrigerated.
- It travels extremely well. I take a mini loaf pre-sliced with me when I’m traveling in my suitcase.
- A serving is approximately 4 slices of a mini loaf (about 1/3 of a mini loaf), and 2 slices of a large loaf.
For time-saving healthy eating, check out the Body Fuel System!

The Body Fuel System uses my simple, proven Eating Types to make it easy to stay on track. It also gives you healthy, fat-burning recipes and foods you can eat to look and feel your BEST every day!
Recipes like….
This is my signature eating system and it contains 6 weeks of done-for-you meal planning and recipe guides! You will not only learn the strategies that have given me long-term success, but also enjoy the time-saving benefits of having it all planned out for you!

